文鎮化から復旧したAmazon Fire 5th genのAOSP化
無事に文鎮化から復旧したAmazon Fire 5th genを、AOSP化することにしました。
まずは、5.1.2へ
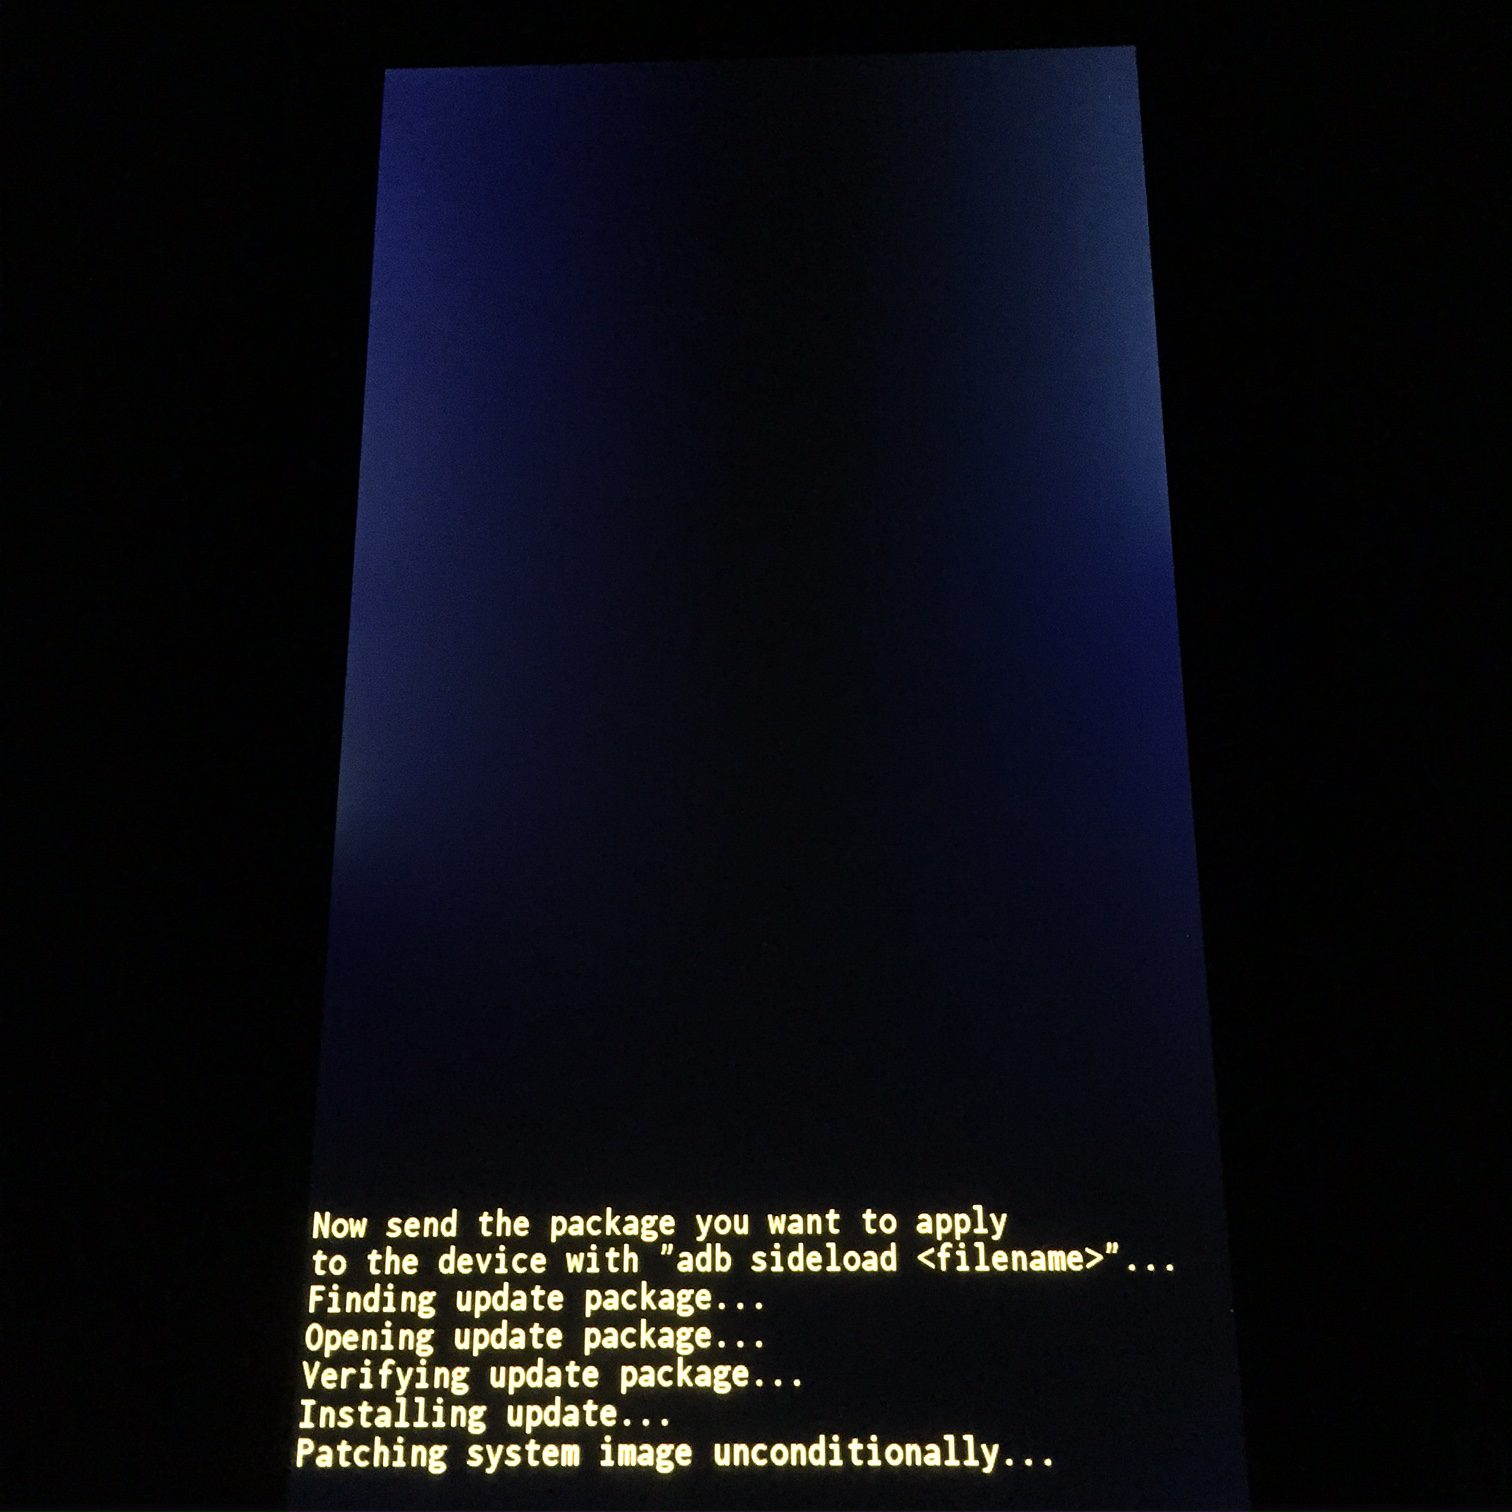
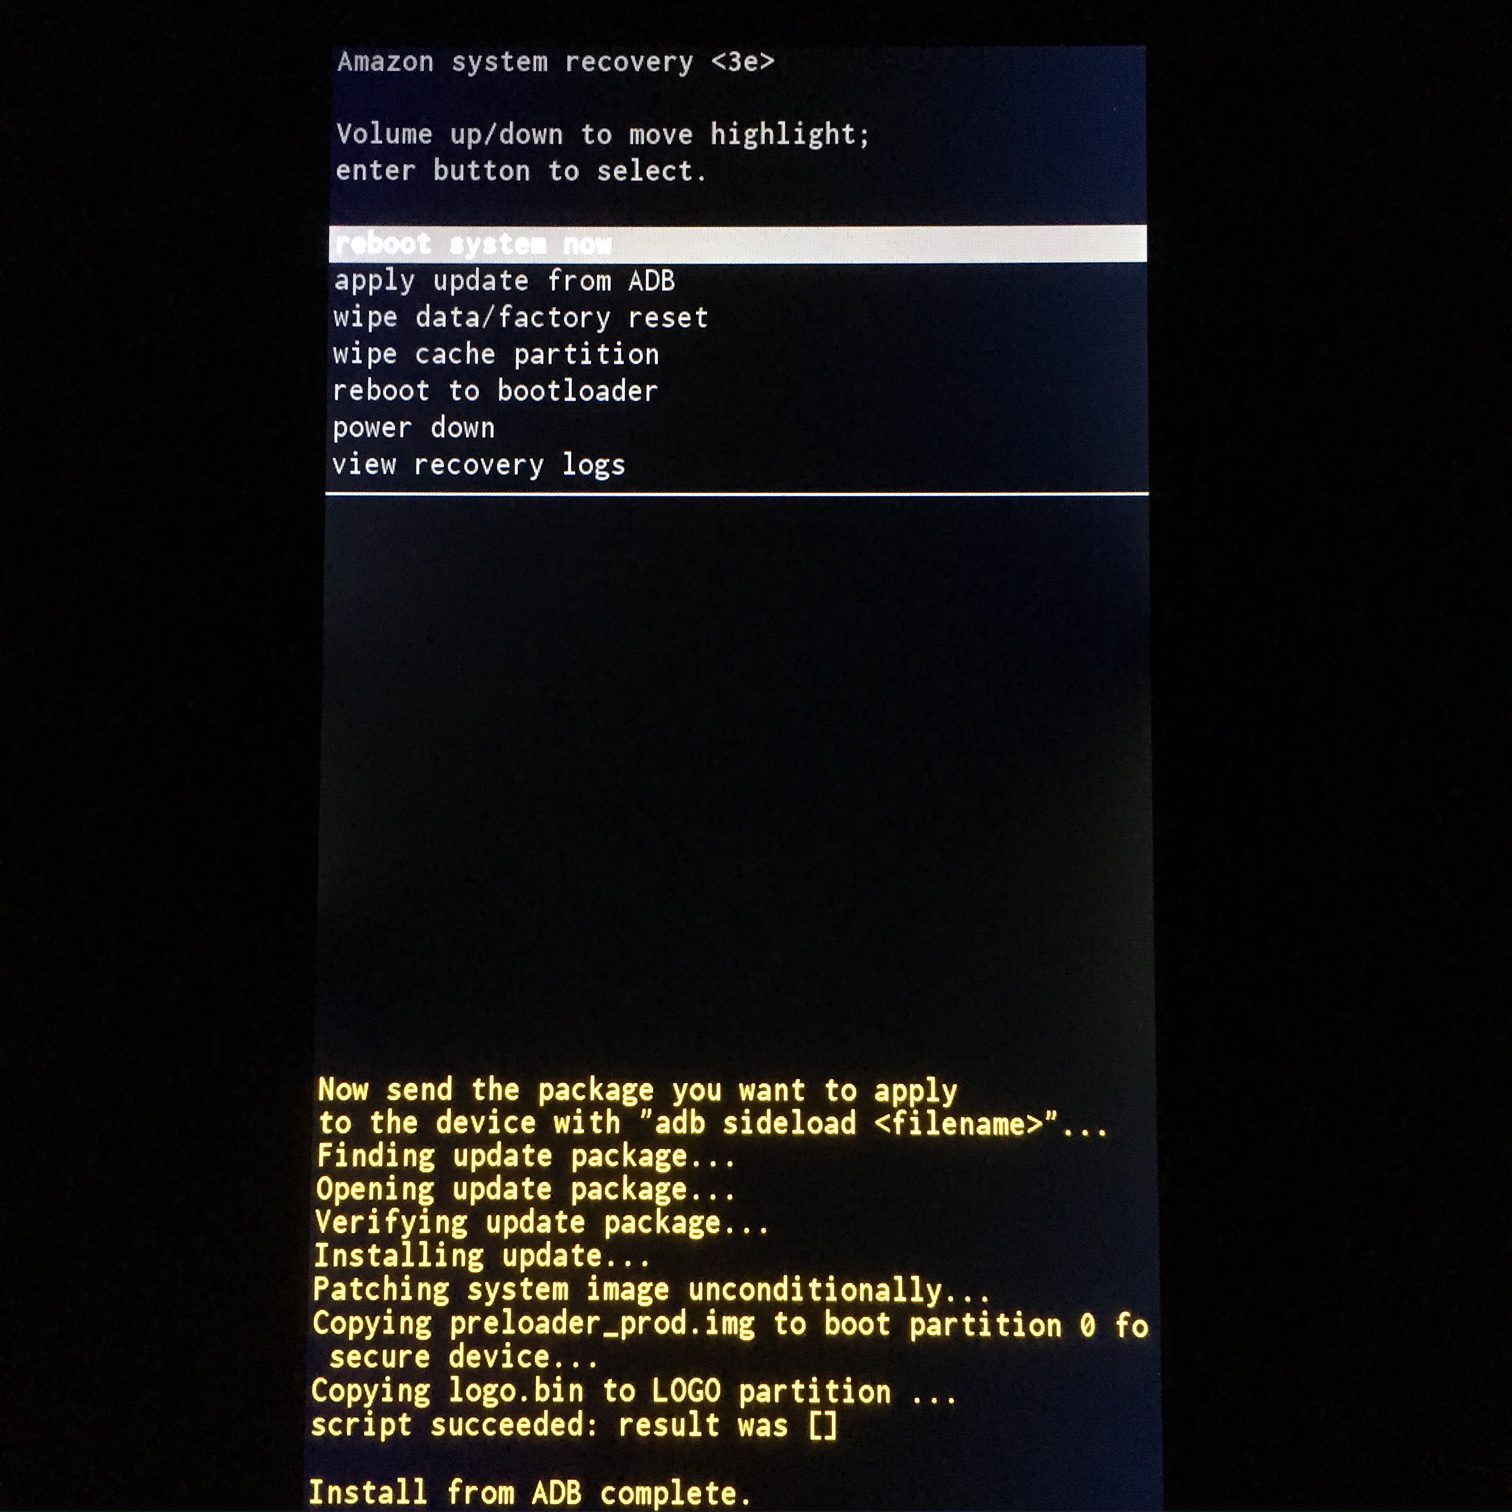
Amazon Fire 7 5th genの電源を一旦切り、「電源ボタン」と「ボリューム ダウン」を同時に押して「リカバリモード」に入ります。
リカバリモード上の上から2番目の「apply update from ADB」をボリュームボタンで選んで、電源ボタンを押すことで、決定〜。
Now send the package you want to apply to the device with "adb sideload <filename>"...
と表示されたら、USBでMacと接続し、接続確認します。
$ adb devices
List of devices attached
G0K0H4045XXXXBTN sideload
あとは、5.1.2のファームを指定して実行です。
$ adb sideload fire-OS-5.1.2-update-kindle-global-37.5.4.2_user_542168620.bin
serving: ‘fire-OS-5.1.2-update-kindle-global-37.5.4.2_user_542168620.bin’ (~8%)
:
Total xfer: 2.00x
転送が終了後に、今回は、すべて初期化した状態にしたいので、
リカバリモード画面の
wipe data/factory reset
wipe cache partition
reboot system now
の順に選択して、電源ボタンをポチっとして、実行します。
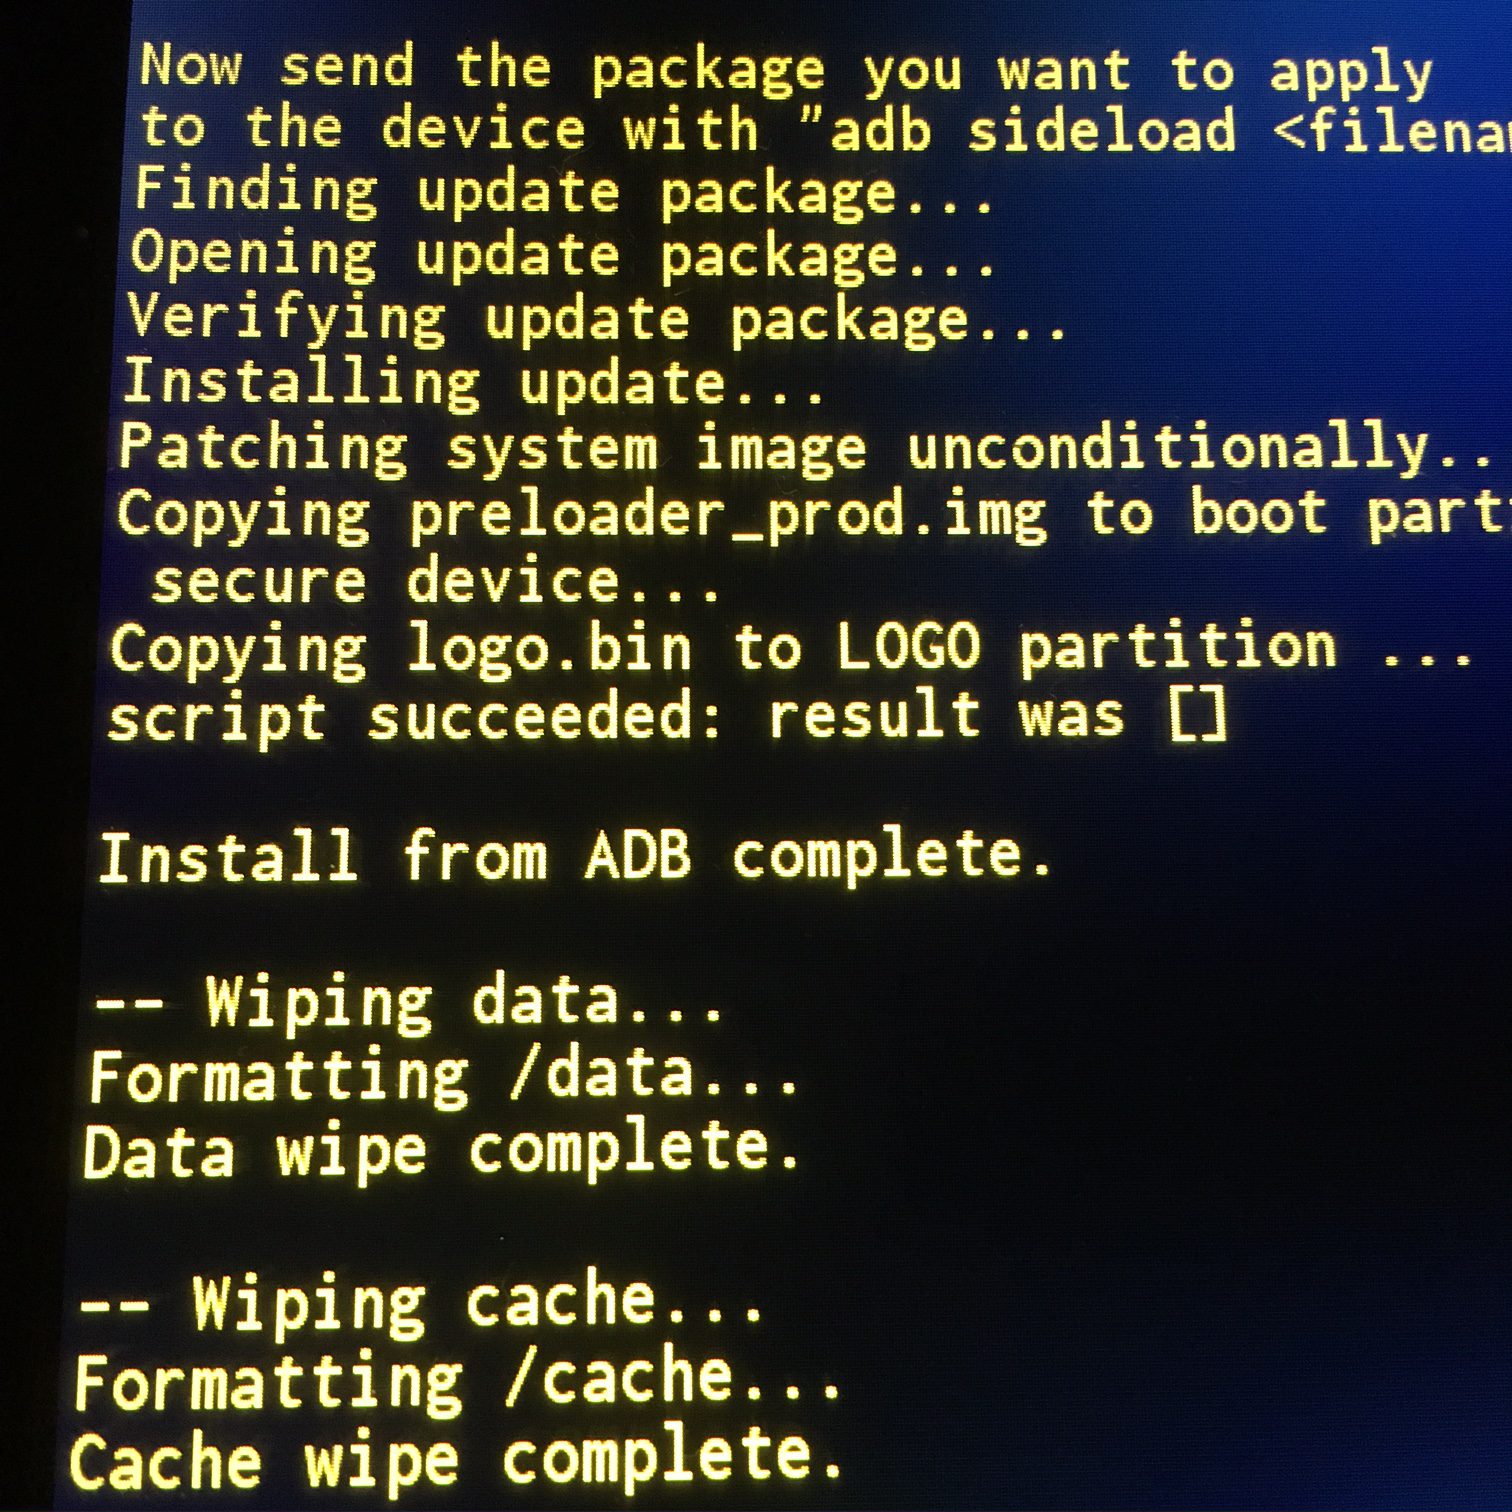
あとは、ブートしてくるのを、しばらく待ちます。
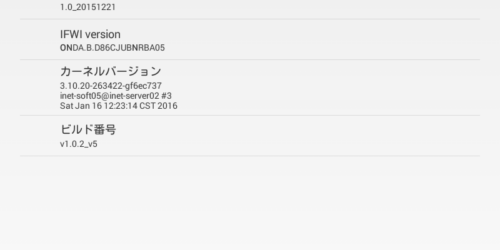
5.1.2にアップデート出来たのを確認したら、AOSP化に入ります。
root化してから、FlashFireの導入(SuperToolを使います)
root化でおなじみのrootjunkyさんのサイトから、SuperToolを利用させていただきます。
SuperToolをダウンロードして、unzipして、実行するだけ(笑)
unzipしたディレクト配下にcdします。
$ cd AmazonFire5thGenSuperTool
$ ls
1-Amazon-Fire-5th-gen.bat auto.bat
2-Boot-Recovery-To-Restore-Device.bat files
3-Amazon-Fire-5th-gen-linux-mac.sh usb_driver
apps
Mac/Linux用のスクリプトがあるので、それを使っちゃいます。
$ ./3-Amazon-Fire-5th-gen-linux-mac.sh
「1」でgoogle playをインストール
よく見ると、すでに (26-Oct-2016時点) 5.3.1にも対応してるのね・・・
___ ____ ____ _____ ____ ___ ____ ____ __ ________ _ _
 / _ \/ _ \/ _ \/_ _/_ / / / / / \/ / //_/\ \/ / / __/ _ \/ \/ \
 / , _/ |_| / |_| / / / / // / /_/ / / < \ /_/ /_/ |_| / , , \
 /_/|_|\____/\____/ /_/ \___/\____/_/\_/_/\_/ /_/_/___/\____/_/ \/ \_\

[*] RootJunkys
 [*] Amazon Fire 5th gen tablet supertool Fire OS 5.1.2 now works on 5.3.1
 [*] Linux / OSX Version
 [*] Remember to chmod +x this script
 [*] NOTE If you are on Fire OS 5.1.4, 5.1.3, or 5.1.2.1 you need to downgrade
 [*] your device firmware by adb sideloading 5.1.2 firmware from Amazon
 [*] YOUTUBE VIDEO Tutorial https://youtu.be/RQLoH-ahjy4
 ----------------------------------------------------------------------------
 1) Google Play Store 1 5) Nova Launcher Install 5
 2) Root Device 2 6) FlashFire App Install 6
 3) Block OTA Updates 3 7) Xposed Framework Install 7
 4) Remove Lock Screen Ads 4 8) Quit 8
 Please enter your choice number: 1
 --------------------------------------------------------------------------------
 [*] First you must turn on ADB DEBUGGING in your Amazon fire 5th gen settings
 [*] go to device options then click on serial number 7 times to enable
 [*] developer options then in developer options turn on Enable adb option.
 [*] This script will install Google Play Store on your Amazon Fire 5th gen
 [*] 7in tablet enjoy
 --------------------------------------------------------------------------------
 press enter to continue

Password:
 * daemon not running. starting it now on port 5037 *
 adb I 38891 230712 usb_osx.cpp:259] Found vid=1949 pid=0222 serial=G0K0H4045XXXXBTN
 adb I 38891 230712 usb_osx.cpp:259]
 * daemon started successfully *
 [*] Installing Google Play Store apps this will take some time
 --------------------------------------------------------------------------------
 [*] Installing app 1 of 4
 3979 KB/s (29005099 bytes in 7.117s)
 pkg: /data/local/tmp/com.google.android.gms-6.6.03-6603036-minAPI9.apk
 Success
 --------------------------------------------------------------------------------
 [*] Installing app 2 of 4
 4029 KB/s (5716290 bytes in 1.385s)
 pkg: /data/local/tmp/GoogleLoginService.apk
 Success
 --------------------------------------------------------------------------------
 [*] Installing app 3 of 4
 4161 KB/s (2360070 bytes in 0.553s)
 pkg: /data/local/tmp/GoogleServicesFramework.apk
 Success
 --------------------------------------------------------------------------------
 [*] Installing app 4 of 4
 4310 KB/s (13859135 bytes in 3.139s)
 pkg: /data/local/tmp/com.android.vending-5.9.12-80391200-minAPI9.apk
 Success
 [*] all apps installed and permissions set.
 [*] please reboot device to finish the process then sign into Play store
 --------------------------------------------------------------------------------
 [*] press enter to exit RootJunky OUT
次に「2」を指定して、root化をします。
 ___ ____ ____ _____ ____ ___ ____ ____ __ ________ _ _
 / _ \/ _ \/ _ \/_ _/_ / / / / / \/ / //_/\ \/ / / __/ _ \/ \/ \
 / , _/ |_| / |_| / / / / // / /_/ / / < \ /_/ /_/ |_| / , , \
 /_/|_|\____/\____/ /_/ \___/\____/_/\_/_/\_/ /_/_/___/\____/_/ \/ \_\

[*] RootJunkys
 [*] Amazon Fire 5th gen tablet supertool Fire OS 5.1.2 now works on 5.3.1
 [*] Linux / OSX Version
 [*] Remember to chmod +x this script
 [*] NOTE If you are on Fire OS 5.1.4, 5.1.3, or 5.1.2.1 you need to downgrade
 [*] your device firmware by adb sideloading 5.1.2 firmware from Amazon
 [*] YOUTUBE VIDEO Tutorial https://youtu.be/RQLoH-ahjy4
 ----------------------------------------------------------------------------
 1) Google Play Store 1 5) Nova Launcher Install 5
 2) Root Device 2 6) FlashFire App Install 6
 3) Block OTA Updates 3 7) Xposed Framework Install 7
 4) Remove Lock Screen Ads 4 8) Quit 8
 Please enter your choice number: 2
 --------------------------------------------------------------------------------
 [*] First you must turn on ADB DEBUGGING in your Amazon fire 5th gen settings
 [*] go to device options then click on serial number 7 times to enable
 [*] developer options then in developer options turn on Enable adb option.
 [*] this tool will boot you into fastboot and root your device.
 [*] device will reboot a couple times during this process.
 --------------------------------------------------------------------------------
 [*] Press enter to continue

* server not running *
 * daemon not running. starting it now on port 5037 *
 adb I 38947 232019 usb_osx.cpp:259] Found vid=1949 pid=0222 serial=G0K0H4045XXXXBTN
 adb I 38947 232019 usb_osx.cpp:259]
 * daemon started successfully *
 --------------------------------------------------------------------------------
 [*] Make sure USB Debugging is enabled on your tablet
 [*] This script will install kingroot to get root access then
 [*] replace it with superSU app.
 --------------------------------------------------------------------------------
 [*] Press enter to continue

[*] installing Kingroot app now
 4020 KB/s (9921006 bytes in 2.409s)
 pkg: /data/local/tmp/Kingroot.apk
 Success
 [*] app installed
 --------------------------------------------------------------------------------
 [*] open kingroot app on the Amazon Fire tablet then try and get root
 [*] access. The device may reboot and try a couple times.
 [*] If it fails just reboot the device then open kingroot and try again.
 [*] try unplugging it from your computer and running kingroot app that way.
 [*] press and key to remove kingroot and install supersu once
 [*] kingroot has working root access.
 --------------------------------------------------------------------------------
 [*] Press enter to continue
kingrootがFire 5th genのランチャに表示されたら、それをクリックして起動。

root取得のために何度かリブートされます。

立ち上がるたびに、kingrootを起動してあげてください。
root取得が終われば、設定画面が表示されます。
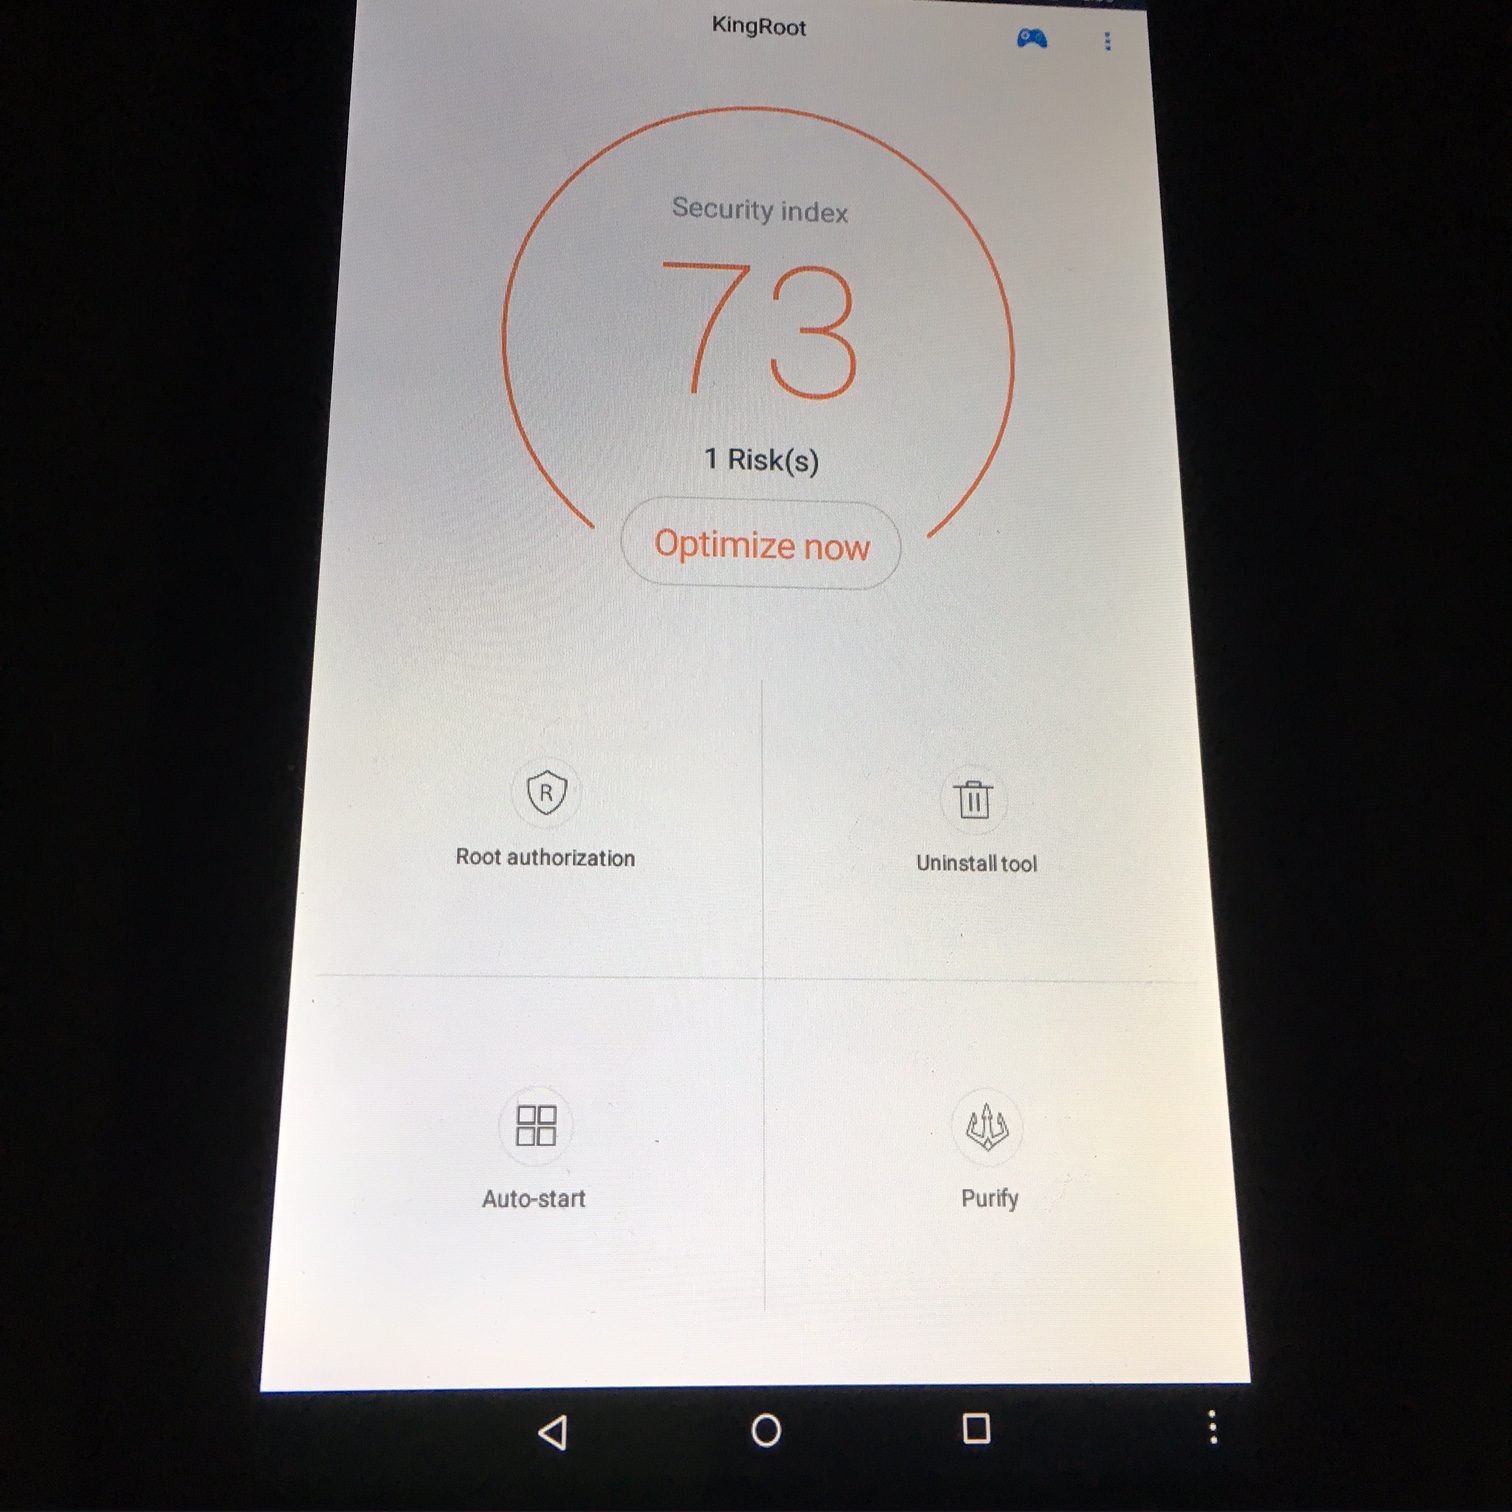
表示されたら、SuperToolへ戻って、次の処理(SuperSUへリプレース)へ進めます。
[*] pushing files to the device
Password:
push: apps/mrw/su -> /sdcard/mrw/su
push: apps/mrw/root.sh -> /sdcard/mrw/root.sh
push: apps/mrw/busybox -> /sdcard/mrw/busybox
push: apps/mrw/Superuser.apk -> /sdcard/mrw/Superuser.apk
push: apps/mrw/.DS_Store -> /sdcard/mrw/.DS_Store
5 files pushed. 0 files skipped.
4036 KB/s (7971852 bytes in 1.928s)
[*] please grant root access on your device to ADB shell
---------------------------------------
---- Thanks @Chainfire for SuperSU ----
---------------------------------------
Failure [DELETE_FAILED_INTERNAL_ERROR]
Failure [DELETE_FAILED_DEVICE_POLICY_MANAGER]
rm: /system/app/Kinguser.apk: No such file or directory
Failure [DELETE_FAILED_INTERNAL_ERROR]
rm: /data/data/com.cafeteam.user: No such file or directory
rm: /data/data/com.kingroot.RushRoot: No such file or directory
rm: /data/data/com.kingroot.kinguser: Directory not empty
rm: /data/data/com.kingroot.master: No such file or directory
chattr: stat /system/bin/ddexe: No such file or directory
rm: /system/bin/ddexe: No such file or directory
pkg: /sdcard/mrw/superuser.apk
Success
chattr: stat /system/usr/iku/isu: No such file or directory
rm: /system/usr/iku: No such file or directory
rm: /dev/reportroot: No such file or directory
chattr: stat /system/etc/install-recovery.sh: No such file or directory
rm: /system/etc/install-recovery.sh: No such file or directory
chattr: stat /system/etc/install_recovery.sh: No such file or directory
the screen freezers here just close it and restart the device
after making sure that supersu app has been opened and updated
rm: /system/app/Kinguser: No such file or directory
rm: /system/app/Cafeuser: No such file or directory
rm: /data/data-lib/king: No such file or directory
rm: /sdcard/Cafeuser: No such file or directory
--------------------------------------------------------------------------------
[*] once supersu app opens click conitnue
[*] then click normal
[*] and finally click ok
[*] last click no thanks and you have supersu install
[*] close supersu app and uninstall any kingroot or purify apps
[*] left on the device.
--------------------------------------------------------------------------------
[*] Press enter to continue
SuperSUがランチャーに表示されたら、クリックして起動。
adb接続のSUは許可、新しいSUがあれば、「通常」で更新等を行います。
リブートされたら、立ち上がるまで、しばし待てばroot化の終了です。
[*] rebooting device now
--------------------------------------------------------------------------------
--------------------------------------------------------------------------------
[*] process finished now just wait for your device to fully boot up
[*] this will take some time if you are on the Optimizing system screen.
[*] NOTE now that you have root please block ota updates
[*] so that you can keep it safe.
--------------------------------------------------------------------------------
[*] ROOTJUNKY OUT
press enter to exit
次に、「6」を選び、FlashFireをインストールします。
___ ____ ____ _____ ____ ___ ____ ____ __ ________ _ _
 / _ \/ _ \/ _ \/_ _/_ / / / / / \/ / //_/\ \/ / / __/ _ \/ \/ \
 / , _/ |_| / |_| / / / / // / /_/ / / < \ /_/ /_/ |_| / , , \
 /_/|_|\____/\____/ /_/ \___/\____/_/\_/_/\_/ /_/_/___/\____/_/ \/ \_\

[*] RootJunkys
 [*] Amazon Fire 5th gen tablet supertool Fire OS 5.1.2 now works on 5.3.1
 [*] Linux / OSX Version
 [*] Remember to chmod +x this script
 [*] NOTE If you are on Fire OS 5.1.4, 5.1.3, or 5.1.2.1 you need to downgrade
 [*] your device firmware by adb sideloading 5.1.2 firmware from Amazon
 [*] YOUTUBE VIDEO Tutorial https://youtu.be/RQLoH-ahjy4
 ----------------------------------------------------------------------------
 1) Google Play Store 1 5) Nova Launcher Install 5
 2) Root Device 2 6) FlashFire App Install 6
 3) Block OTA Updates 3 7) Xposed Framework Install 7
 4) Remove Lock Screen Ads 4 8) Quit 8
 Please enter your choice number: 6
 --------------------------------------------------------------------------------
 This Option will install Flash Fire app on your tablet
 First you must turn on ADB DEBUGGING in your Amazon fire 5th gen settings
 go to device options then click on serial number 7 times to enable
 developer options then in developer options turn on Enable adb option.
 --------------------------------------------------------------------------------
 [*] press enter key to start

* server not running *
 * daemon not running. starting it now on port 5037 *
 adb I 39276 241906 usb_osx.cpp:259] Found vid=1949 pid=0222 serial=G0K0H4045XXXXBTN
 adb I 39276 241906 usb_osx.cpp:259]
 * daemon started successfully *
 [*] Installing FlashFire app this will take some time
 --------------------------------------------------------------------------------
 Invalid APK file: apps/FlashFire-v0.53.apk
 --------------------------------------------------------------------------------
 [*] FlashFire Installed check your Apps on the device
 --------------------------------------------------------------------------------
 [*] press enter to exit RootJunky OUT
って、Invalidって言ってるし・・
ファイル名の大文字・小文字があってないのね・・。
ということで、一旦、ツールを終了して、
$ mv flashfire-0.53.apk FlashFire-v0.53.apk
でもって、もう一度、SuperToolを起動して、FlashFireをインストールします。
$ ./3-Amazon-Fire-5th-gen-linux-mac.sh
 ___ ____ ____ _____ ____ ___ ____ ____ __ ________ _ _
 / _ \/ _ \/ _ \/_ _/_ / / / / / \/ / //_/\ \/ / / __/ _ \/ \/ \
 / , _/ |_| / |_| / / / / // / /_/ / / < \ /_/ /_/ |_| / , , \
 /_/|_|\____/\____/ /_/ \___/\____/_/\_/_/\_/ /_/_/___/\____/_/ \/ \_\

[*] RootJunkys
 [*] Amazon Fire 5th gen tablet supertool Fire OS 5.1.2 now works on 5.3.1
 [*] Linux / OSX Version
 [*] Remember to chmod +x this script
 [*] NOTE If you are on Fire OS 5.1.4, 5.1.3, or 5.1.2.1 you need to downgrade
 [*] your device firmware by adb sideloading 5.1.2 firmware from Amazon
 [*] YOUTUBE VIDEO Tutorial https://youtu.be/RQLoH-ahjy4
 ----------------------------------------------------------------------------
 1) Google Play Store 1 5) Nova Launcher Install 5
 2) Root Device 2 6) FlashFire App Install 6
 3) Block OTA Updates 3 7) Xposed Framework Install 7
 4) Remove Lock Screen Ads 4 8) Quit 8
 Please enter your choice number: 6
 --------------------------------------------------------------------------------
 This Option will install Flash Fire app on your tablet
 First you must turn on ADB DEBUGGING in your Amazon fire 5th gen settings
 go to device options then click on serial number 7 times to enable
 developer options then in developer options turn on Enable adb option.
 --------------------------------------------------------------------------------
 [*] press enter key to start

* server not running *
 * daemon not running. starting it now on port 5037 *
 adb I 39411 245194 usb_osx.cpp:259] Found vid=1949 pid=0222 serial=G0K0H4045XXXXBTN
 adb I 39411 245194 usb_osx.cpp:259]
 * daemon started successfully *
 [*] Installing FlashFire app this will take some time
 --------------------------------------------------------------------------------
 4204 KB/s (11955229 bytes in 2.777s)
 pkg: /data/local/tmp/FlashFire-v0.53.apk
 Success
 --------------------------------------------------------------------------------
 [*] FlashFire Installed check your Apps on the device
 --------------------------------------------------------------------------------
 [*] press enter to exit RootJunky OUT
というわけで、root化とflashfireがインストールできました。
flashfireを起動して、AOSPの導入をしていきます。
用意するもの:
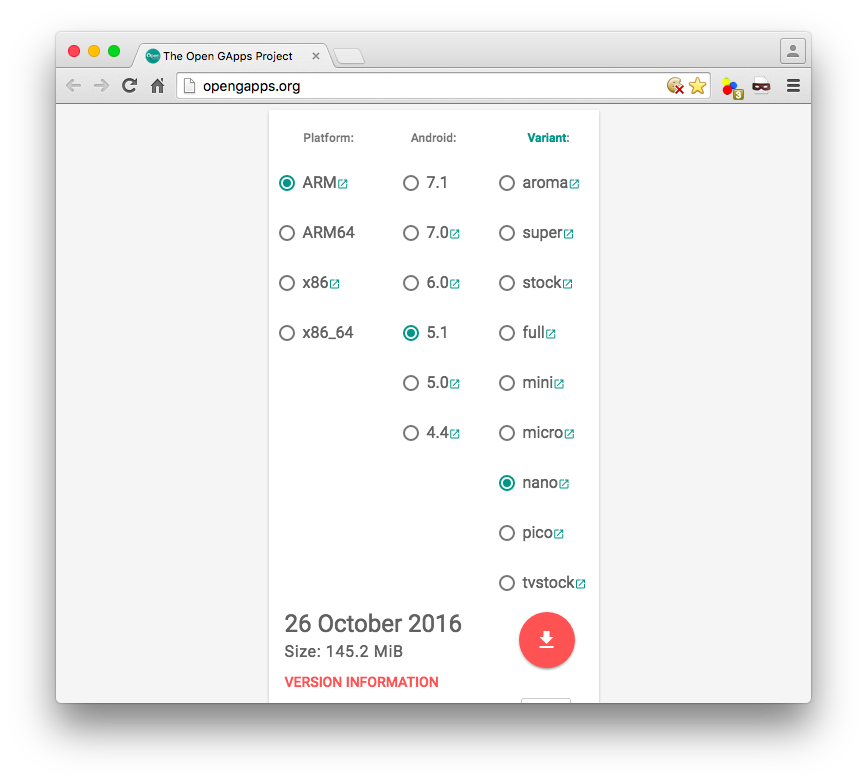
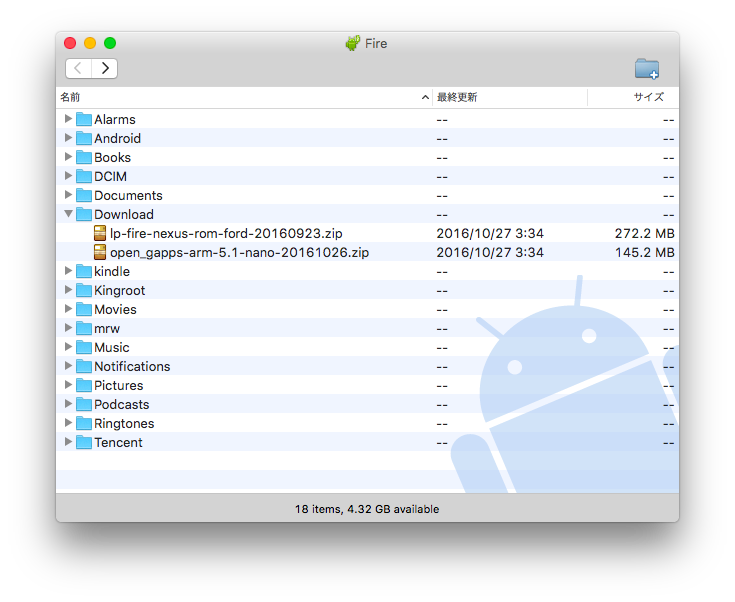
Fire Nexus ROM for Amazon Fire 7″ 2015 Tabletから、lp-fire-nexus-rom-ford-20160923.zipをダウンロード
gappsから、「ARM – 5.1 – nano」選択してダウンロード「lp-fire-nexus-rom-ford-20160923.zipに、すでに入ってるよ」と指摘いただきました。
これら2つのファイルを、Amazon Fire 5th genのDownloadフォルダへコピーしておきます。
以上で、下ごしらえが完了です。
FlashFireで、AOSPを焼いていきます。
FlashFireでAOSPを焼き焼き
Fire 5th genで、先ほどインストールしたFlashFireを起動します。

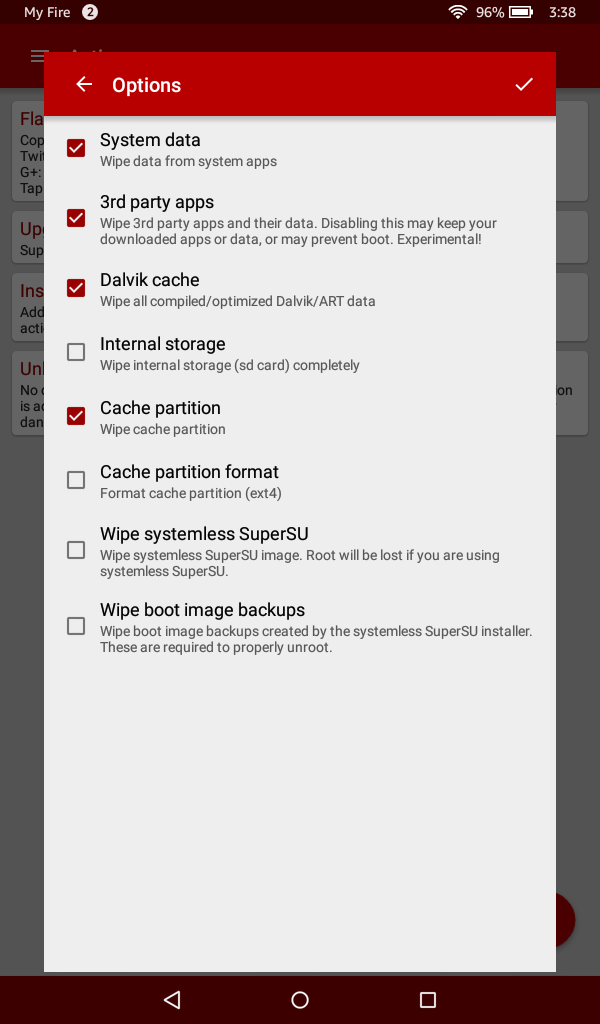
画面右下の「赤丸+」をクリックして、AOSPを焼くためのROMやら、wipeやらを指定していきます。
FLASHする順序としては、「wipe -> AOSP -> gapps」となるように指定していきます。
簡単に言ってしまうと、赤丸+ -> wipe -> system data / 3rd party apps / Dalvik cache / Cache Partition を選択して✔︎

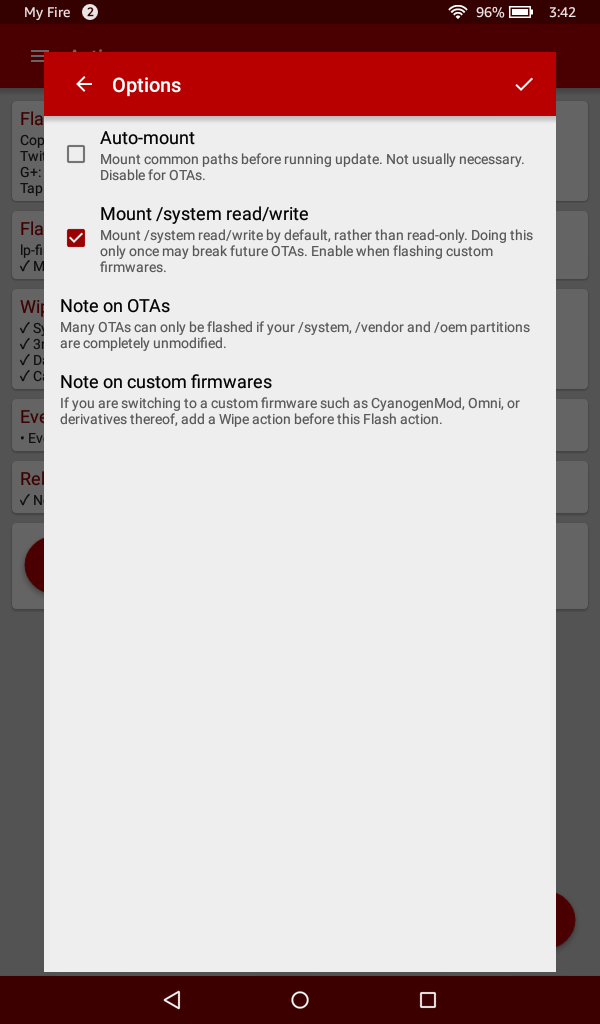
赤丸+ -> Flash ZIP or OTA -> lp-fire-nexus-rom-ford-20160923.zip -> Mount /sytem read/writeをチェック -> ✔︎
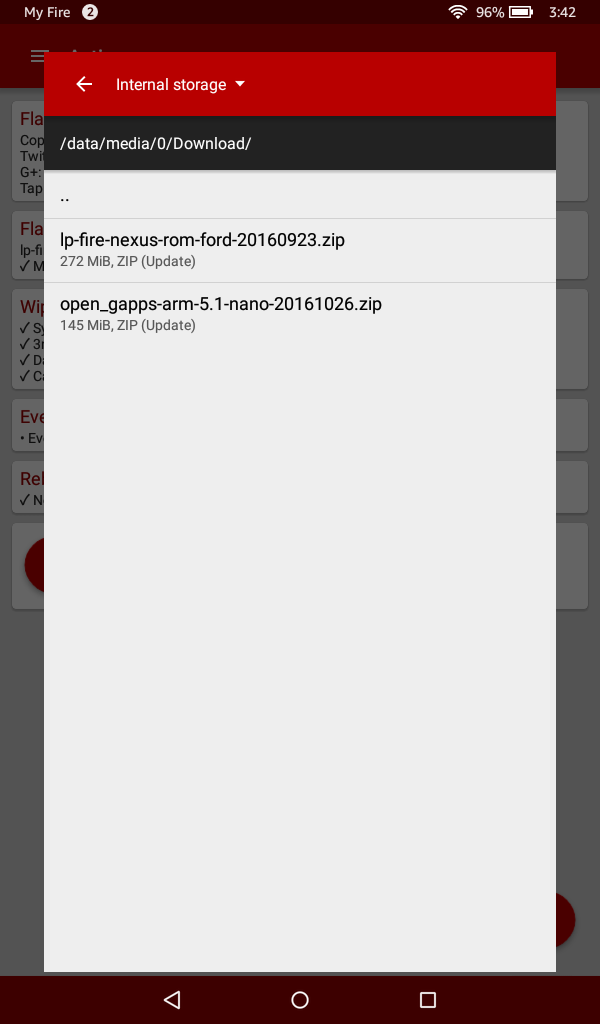
赤丸+ -> Flash ZIP or OTA -> open_gapps_arm-5.1-nano-xxxxxxxx.zip -> Mount /sytem read/writeをチェック -> ✔︎
lp-fire-nexus-rom-ford-20160923.zipにgappsはすでにはいっているので、これのインストールは必要ありません。
以上の処理を設定したら、処理順序の確認です。
Wipe -> lp-fire-nexus-romを書き込み -> open_gappsを書き込み ->リブートの順になるようにします。
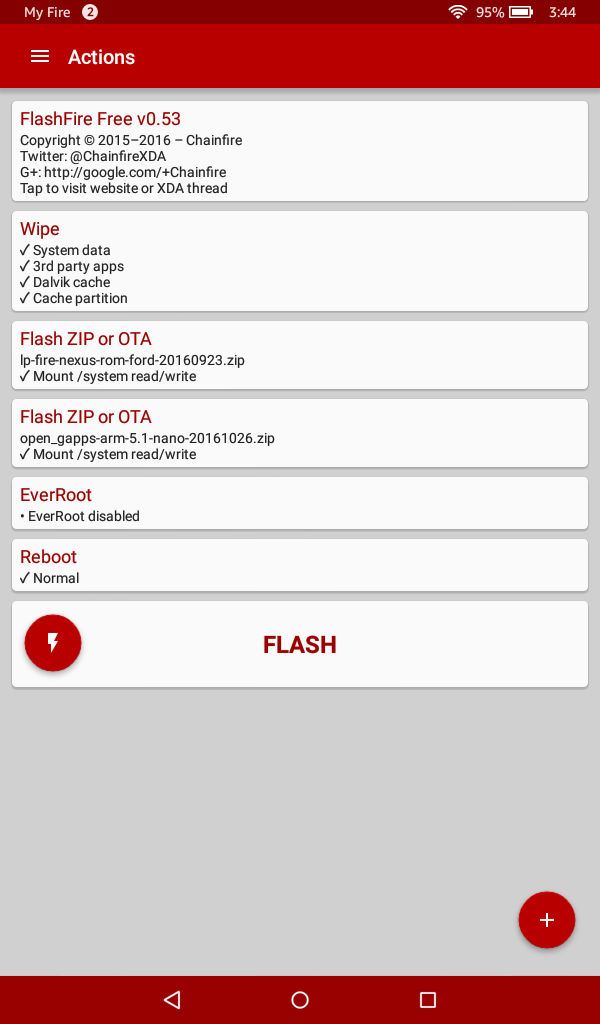
問題なければ、「FLASH」ボタンをクリックします。
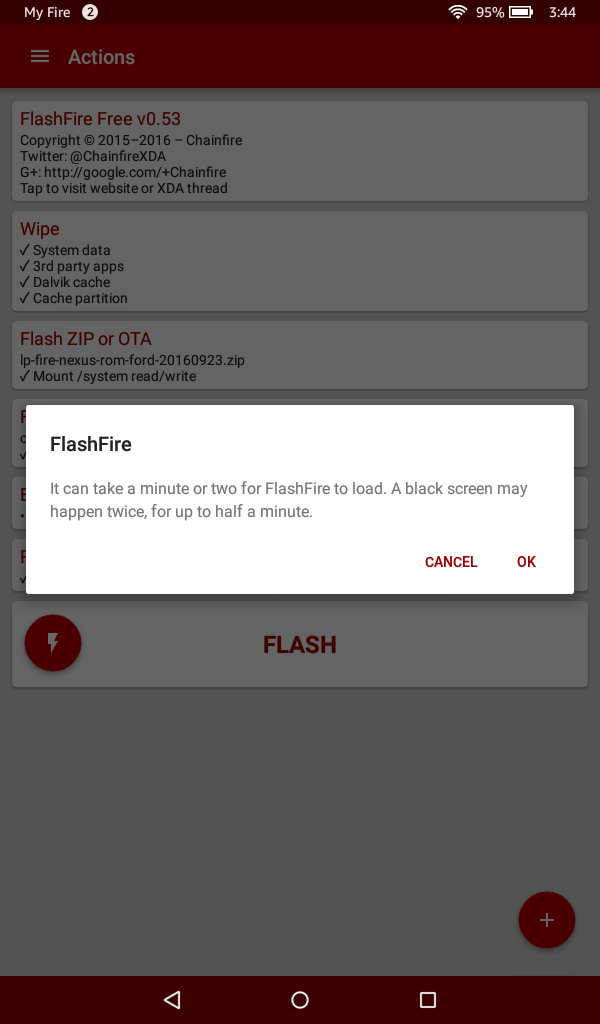
書き込みが開始されます。
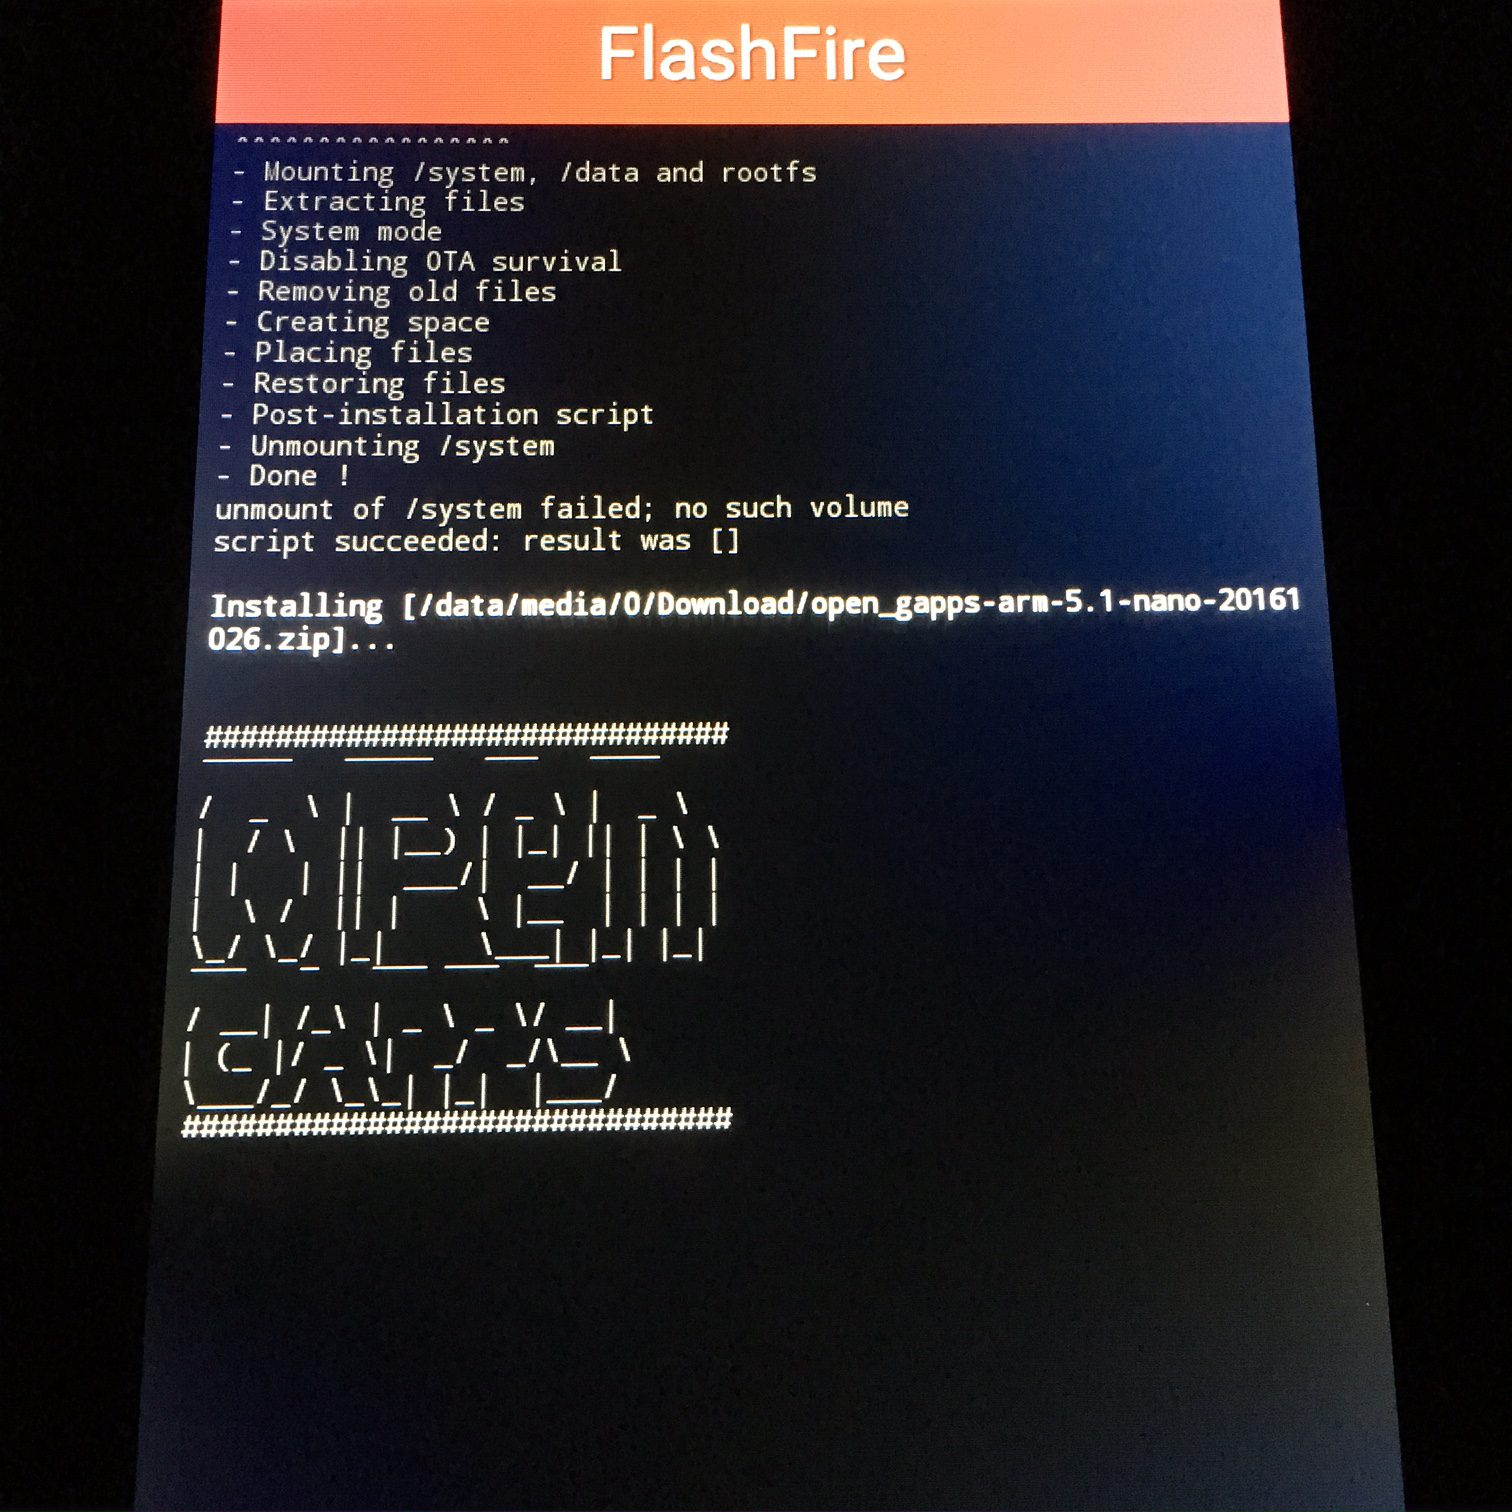
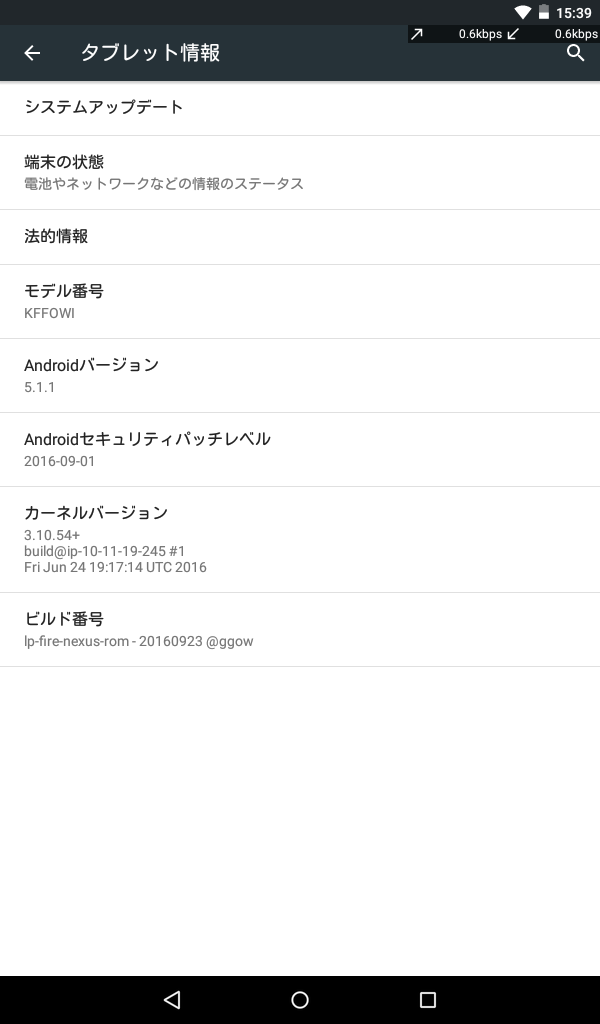
しばらく時間がかかりますが、無事にAOSPで上がってきました。